In the intricate world of trading, the ability to decipher and understand candlestick patterns can significantly tip the scales in your favor. Among the myriad of patterns that traders encounter, the Pin Bar stands out as a reliable harbinger of potential market reversals. This pattern, distinguished by its unique structure, serves as a powerful tool in the trader’s arsenal, providing invaluable insights into the ever-changing dynamics of the market. The Pin Bar, with its small body and long tail, is a visual representation of a tug-of-war between buyers and sellers, often indicating a shift in the balance of power.
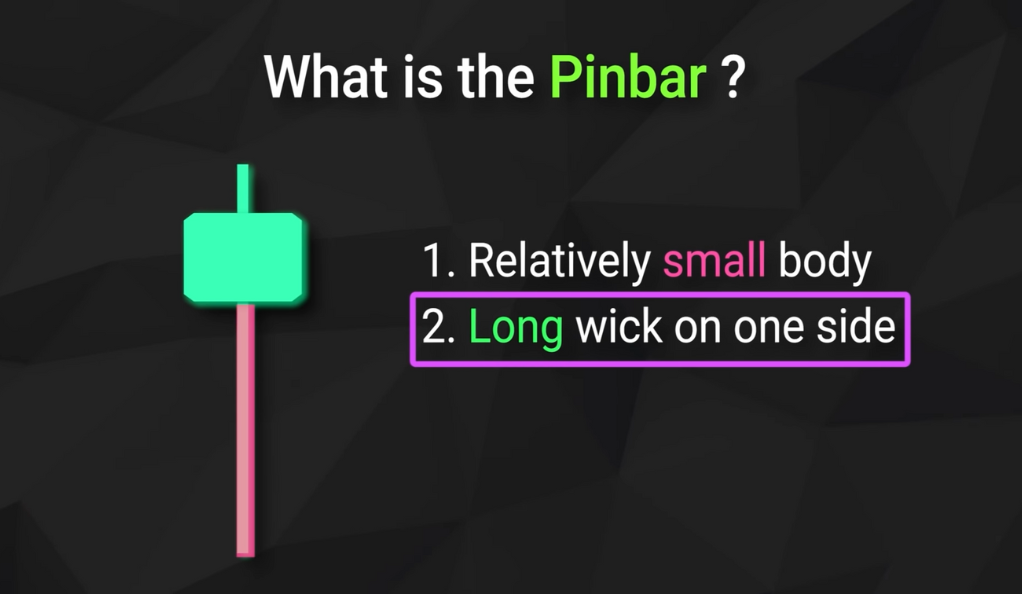
But what exactly is a pin bar, and how can it be harnessed effectively in trading? The pin bar, a specific type of candlestick pattern, is often spotted before a market reversal occurs. It’s characterized by a small body, indicating a narrow price range between the opening and closing trades, and a long wick or “tail” that sticks out on one side, representing a larger swing in prices within the same period. This unique formation can provide traders with a signal to potentially capitalize on an impending market reversal. However, like any trading tool, understanding its nuances and applying it correctly within a broader trading strategy is key to leveraging its full potential.
What is a Pin Bar?
A pin bar, in the realm of trading, is a unique candlestick pattern that often serves as a precursor to a market reversal. This pattern is easily identifiable by its distinct characteristics – a small body coupled with a long wick or “tail” that protrudes on one side. The small body of the pin bar represents the area between the open and close of that period’s trading, while the long tail shows the range of the period’s price action.
In some variations of the pin bar, there may also be a smaller wick on the opposite side of the tail. This is commonly referred to as the “nose” of the pin bar. The presence of a nose, however, is not a prerequisite for a valid pin bar. What truly defines a pin bar is the small body and the long tail. These features collectively signify a period of trading where there was a significant push in one direction, followed by a strong reversal and close in the opposite direction.
The Significance of the Pin Bar
The pin bar holds a significant place in the world of trading. It’s not just a pattern that traders observe on their charts; it’s a powerful signal that indicates a shift in market momentum. The formation of a pin bar is a visual representation of a tug-of-war between buyers and sellers, and it often signals a rejection of the prevailing market momentum. This makes the pin bar a crucial tool for traders, as it can provide early indications of potential market reversals.
Consider a scenario where the market is experiencing an upward momentum. Buyers are in control, pushing prices higher. Suddenly, sellers enter the market and start to push the price down. This shift in control from buyers to sellers is what forms the pin bar. The small body and long tail of the pin bar visually represent this shift in momentum. The tail, pointing in the direction of the initial momentum, shows the highest or lowest point reached before the market rejected this level and reversed, leading to the formation of the small body of the pin bar. This shift in momentum, represented by the pin bar, can provide traders with a valuable opportunity to potentially profit from the impending market reversal.
Types of Pin Bars: Bullish and Bearish
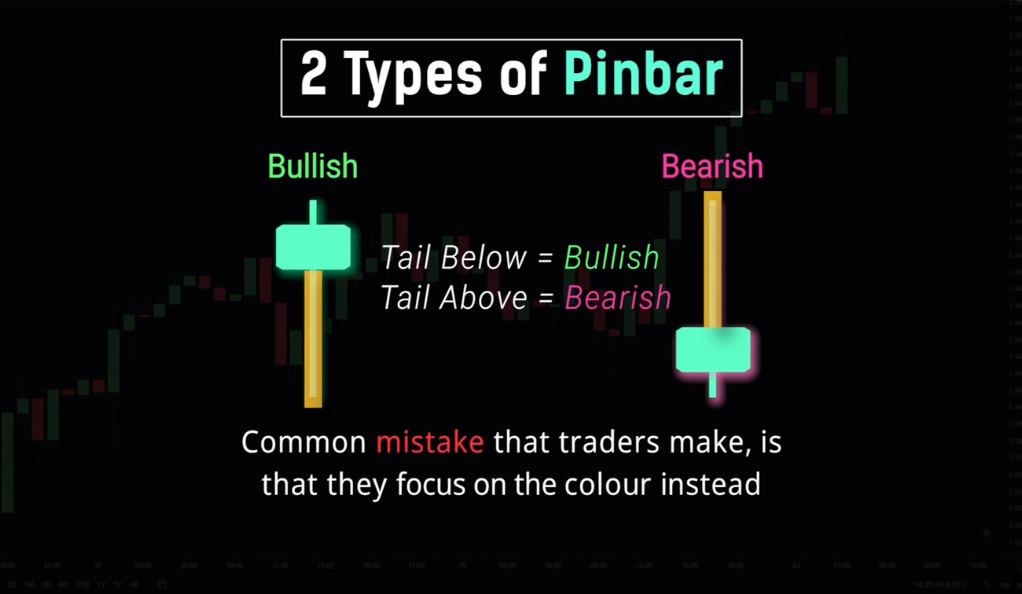
Pin bars are not all the same; they come in two types – bullish and bearish. A bullish pin bar indicates a likely upward reversal, while a bearish pin bar signals a likely downward reversal. The position of the tail determines whether it’s bullish (tail below the candle) or bearish (tail above the candle). Interestingly, the color of the pin bar does not determine its type.
Bullish Pin
A bullish pin bar is characterized by a small body located at the bottom of the candlestick, with a long tail or wick extending upward. This formation suggests that there was a rejection of downward price movement, indicating a potential shift towards upward momentum. In other words, buyers stepped in and pushed the price higher after sellers initially pushed it down. The bullish pin bar signals a likelihood of an upward reversal or continuation of an upward trend.
Bearish Pin
Conversely, a bearish pin bar is identified by a small body located at the top of the candlestick, with a long tail or wick extending downward. This pattern signifies a rejection of upward price movement, indicating a potential shift towards downward momentum. Here, sellers exerted pressure and pushed the price lower after buyers initially pushed it up. The bearish pin bar indicates a likelihood of a downward reversal or continuation of a downward trend.
Trading with Pin Bars: A Word of Caution
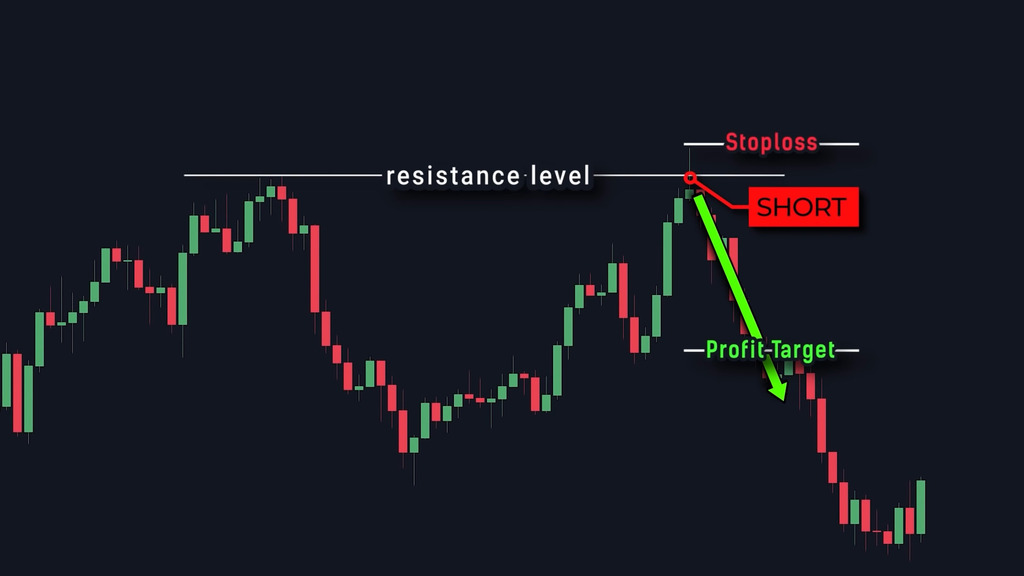
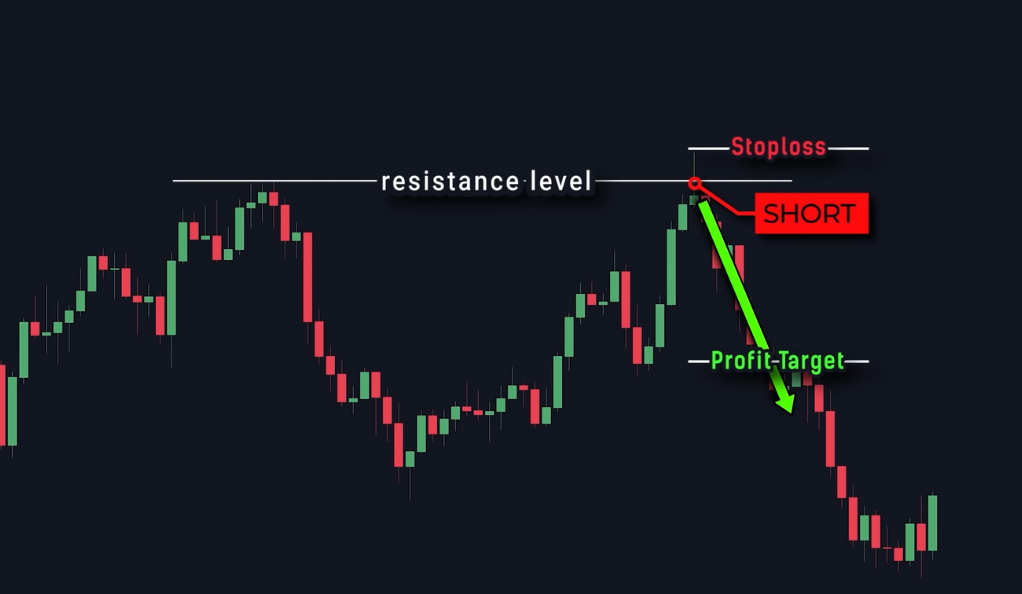
When it comes to trading with pin bars, it’s important to exercise caution and avoid jumping to conclusions solely based on the appearance of a pin bar. While pin bars can provide valuable insights into potential market reversals, they should not be considered as standalone indicators. It’s essential to take into account other supporting factors before making trading decisions. Pin bars that form at key levels, such as significant support or resistance levels, tend to carry more weight and are considered high-quality setups.
These key levels act as crucial reference points in the market, representing areas where the price has historically reacted or reversed. When a pin bar forms at a key level, it signifies that there is a confluence of factors aligning, increasing the probability of a meaningful market reversal. By combining the presence of a pin bar with the confirmation of a key level, traders can enhance the reliability of their trading setups.
However, it’s important to note that even high-quality pin bar setups do not guarantee a successful trade. Trading always carries inherent risks, and no strategy or pattern is infallible. Therefore, it is paramount to apply proper risk management techniques, such as setting stop-loss orders and managing position sizes, to protect against potential losses and ensure long-term trading success. By exercising caution, considering supporting factors, and implementing sound risk management practices, traders can make the most of pin bar trading strategies while minimizing potential downsides.
Risk Management: A Must in Trading
Trading is not just about spotting patterns; it’s also about managing risks. When trading with pin bars, it’s important to always keep risk management in check. A stop loss can be set at the end of the tail, and a profit target can be set at two to three times the stop loss.
The Art of Spotting High-Quality Setups
Spotting high-quality setups in trading, particularly with pin bar patterns, involves identifying those that occur at key levels such as support or resistance. These setups, supported by multiple signals, increase the likelihood of a market reversal, making them attractive to traders.
The Role of Confluence in Trading
In the dynamic world of trading, the concept of confluence holds significant importance. Confluence refers to a point where two or more key levels intersect each other on a price chart. When a price reaches a level of confluence, it indicates a higher probability of a significant market reaction at that point. This confluence of key levels serves as a valuable tool for traders in making informed trading decisions.
In trading, confluence occurs when multiple key levels intersect, reinforcing the significance of a specific price area. This convergence, such as the alignment of a support level with a trendline or Fibonacci retracement level, increases confidence in potential price reactions. Traders view confluence as a strong indication of higher probability trade setups, as it signifies the convergence of multiple market forces. By identifying and utilizing confluence levels, traders gain an edge, focusing on areas where multiple factors align and enabling a more comprehensive market analysis for identifying high-probability opportunities and managing risk effectively. Confluence acts as a guiding principle, aiding traders in navigating the complexities of financial markets with confidence and precision.
The Importance of Confirmation Methods
To increase the effectiveness of the pin bar trading strategy, it is crucial to incorporate confirmation methods like support and resistance levels. These additional techniques validate the potential reversal indicated by the pin bar pattern, filtering out false signals and improving the accuracy of trade setups. By combining the pin bar with confirmation methods, traders can enhance their decision-making process and increase the probability of successful trades.
Conclusion
In conclusion, the pin bar pattern is a powerful tool in the hands of a trader. It helps identify market rejections and potential reversals. However, it’s not a magic wand that guarantees success. It should be used in conjunction with other strategies and always with proper risk management. Remember, trading is all about probability, and nothing is ever guaranteed. So, keep learning, keep practicing, and may the odds be ever in your favor.
Ainu Token aims to offer impartial and trustworthy information on cryptocurrency, finance, trading, and shares. However, we don't provide financial advice and recommend users to conduct their own studies and thorough checks.
Comments (No)